Skip to content
Financial Management
Accounting, General Ledger, Accounts Payable, Receivable, and Cash Management, Reporting of financial operations.
Customer Management
An integrated CRM to manage marketing, quoting, sales, post-sales support, and customer information.
Field Service Management
Mobile Field Service for real-time data between the field and office, track equipment, maintenance and manage service orders.
Construction
Powerful financials, Job Cost Accounting, Project Management, Payroll, Inventory, Service Management, CRM, and more.
Manufacturing
Streamline operations from production planning and shop floor management to financials, CRM, inventory, and sales orders.
Project Accounting
Manage budgeting, inventory, change orders, timesheets, billing, profitability, and reporting for individual business initiatives. 
Wholesale Distribution
Advanced inventory management, WMS, serial and batch tracking, kit assemblies, bin location, pick/pack/ship.
eCommerce & Retail
Synchronise real-time data between MYOB Advanced ERP and BigCommerce or Shopify with a native connector.
Payroll & Workforce Management
A modern Cloud Payroll and HR Management Solution working alongside MYOB Advanced ERP.

All you need to Advance your business

MYOB Advanced Cloud ERP has the flexibility to grow with your business.

Are you ready to take your business to the next level? 

Connect all your business functions with MYOB Advanced in the Cloud

Wholesale Distribution
Advanced inventory management, serial and batch tracking, kit assembly, bin location, pick priorities, manage multiple customer and supplier price lists, order discounting.
Retail and eCommerce
Native eCommerce Connector provides tools for syncing data between MYOB Advanced ERP and leading eCommerce solutions, BigCommerce and Shopify.
Manufacturing
By connecting production planning, shop floor, financials, CRM, inventory management, and sales orders, it enables real-time coordination across your entire organisation.
Field Services Management
Streamline tasks, scheduling and routing, manage inventory of tools and parts, seamlessly integrate accounting, and administrative information into a single unified system.
Construction
Project Accounting, Project Billing, Contracts, Job Costing, Change Orders, Daily Field Reports, Retentions, Compliance, Mobile Applications, Payroll and Reporting in one solution.
Solutions for all industries
MYOB Advanced is designed to adapt to the ever-changing landscape of different industries. With customisation options, it effortlessly caters to a diverse range of industries. 

MYOB Advanced Cloud ERP for New Zealand Businesses

Are you ready to take your business to the next level? 

Connect all your business functions with MYOB Advanced in the Cloud

MYOB Advanced Dashboard

Product Demos & Support

Support and Resources for MYOB Advanced Cloud ERP Users

The Avanza Solutions Support Services take the hard work out of keeping up with these changes and assist your business in reaping the benefits from your software investment, both now and in the future.

 
Our support team steps in after you “go live” with MYOB Advanced. When choosing Avanza Solutions for your everyday support queries, you will have access to a highly trained MYOB Certified team who are solution driven. 
  • Demonstrations and Training Videos
  • Helpful resources to get you started with MYOB Advanced
  • MYOB Advanced Upgrade Deployments
  • Recommended Month-End Tasks
  • Basic Elements of the MYOB Advanced Interface
  • Using the Search Functionality
  • Using the Recently Viewed Feature
  • Companies and Branches
  • The Information Area
  • MYOB Advanced Help
  • The Main Menu
  • Editing the Menu
  • Frequently Asked Questions

Demonstrations and Training Videos

Access all our free training and support video content on our YouTube channel.

MYOB Advanced All Videos

How to use MYOB Advanced

Demonstrations

Introduction

CFO Overview Demo

Construction

Wholesale Distribution

Manufacturing

eCommerce

Services

Helpful resources to get you started with MYOB Advanced

MYOB Advanced Academy 
First head over to MYOB Advanced Academy where you can watch Introductory videos on  MYOB Advanced which is linked to the MYOB Advanced Help Centre.

Online Knowledge Base 
Whether you are about to start implementation or are ready to go live, you can find articles and technical white papers with detailed product information in the knowledge base.  

MYOB Academy
Continue your learning journey by enrolling in MYOB training courses at the MYOB Academy.  MYOB Academy is a Learning Platform and is a constantly developing resource that can be used to learn how to utilise your MYOB software.

Community Forum 
You can register here to be part of the MYOB community and chat with like-minded peers
Click here to access the community forum.

MYOB Advanced Mobile App 
Access MYOB Advanced Business anywhere, any time on any device with an easy-to-use mobile app.

Apple App Store

Google App Store

YouTube Playlist 
You can also find a number of short videos demonstrating the MYOB Advanced functionalities here: MYOB Advanced Business 

Upgrade Deployments

MYOB is responsible for upgrading your MYOB Advanced system. The upgrade itself is covered as part of your license agreement with them. If you need assistance with pre-upgrade testing or have questions following the upgrade, then Verde is there for you and this activity is a standard consulting service which we can provide a quote for or work on a time and materials basis.

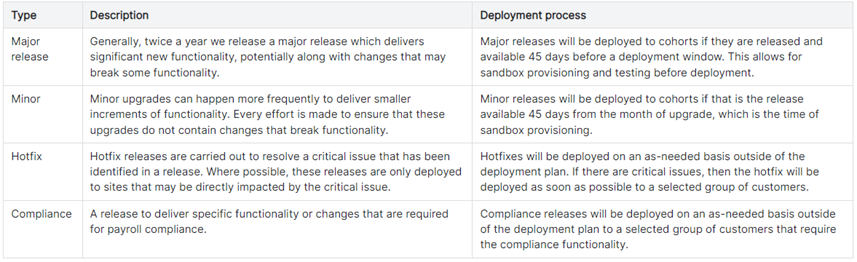
There are four types of Upgrade releases that could be applied to your system. These are:

upgradedeployments

Cohorts

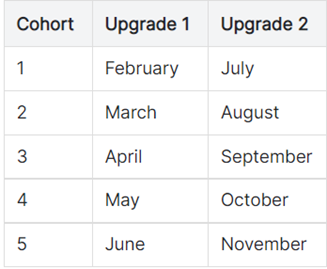
Major release upgrades are deployed to your site twice a year based on Cohorts meaning your two upgrades will be 5 months apart. Your site will be automatically added to the Cohort in the month your site is provisioned so your first upgrade will be 5 months after that. There are no upgrades in December or January, so the 5 cohorts are as per the below.

upgradewindow

You can opt-out of one of the two major upgrades per year but not both. Cohorts are fixed at the beginning of the year, and you are unable to move between them once set for the year.

Each month has 4 upgrade windows, and we can move you between those windows if a particular date works better for you that month. These windows are locked in approximately 45 days before the first day of the cohort month.

In-App Notifications

MYOB provides in-app communication to users set to receive the notifications pertaining to upgrades.  This will include information on:

  • What to Expect

  • What’s changed (including Release Notes)

  • How to prepare and Sandboxes

  • Upgrade Preparation Tasks

  • Post Upgrade Survey

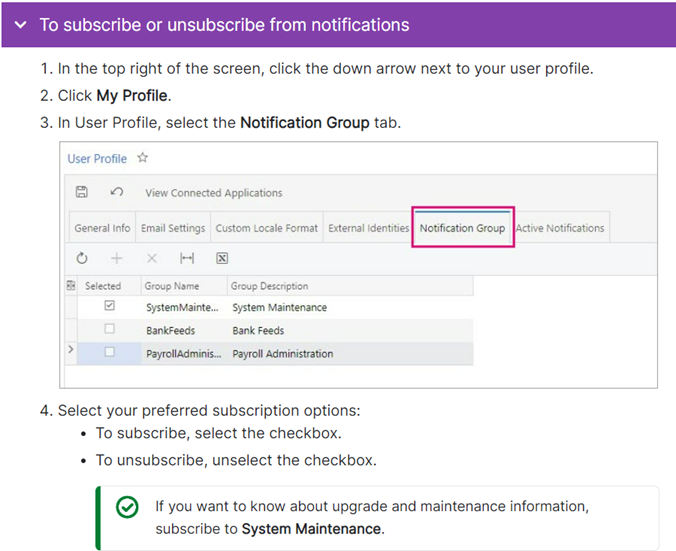
The instructions for adding yourself to the Notification Group for upgrade and maintenance information are below or click for more information on In App Notifications.

InAppNotification

Sandboxes

A sandbox is a testing environment taken from a copy of your production system.  Sandboxes for Major Releases are provided free of charge approximately 30 days before your upgrade month and expire three days after your upgrade.  Sandboxes you request for other release types or for your own testing outside of a major upgrade are charged on a per-month basis. 

Sandboxes are not mandatory for a major upgrade but we highly recommend one and so we always request it on your behalf approximately 45 days before the first day of the cohort month.  They are accessed via a separate URL address which will be advised to you once it is available.  Your user login details will be the same as your production system.

Testing and Support

We highly recommend testing your core business functionality and any customisations your site has once you receive your sandbox.  This is especially important for a major upgrade with a lot of introduced functionality.  We are happy to work with you to devise a training plan that best suits your organisation adding in anything that is unique to you.  If you find an issue during your testing, please email screenshots to either your lead consultant or the support email.  We are also able to assist you with testing or go through the test plans for you and can provide a quote for that.

Release Notes as to what is included in each deployment are provided either in your In-App notifications or by using this link MYOB Advanced Release Notes.  You can find the current version of your system at the bottom of the login screen to know which version you are moving from.

Upgrade Process

Upgrades start at 10 pm on your assigned date with the system back up by 6 am the next morning.  If an upgrade fails for some reason or is not going to be completed by 6 am then MYOB will restore to your current version and reallocate your upgrade to a new window.  If you have customisations, then Verde may need to republish them for you on the morning after the upgrade, and your consultant will work with you on that.

The version you will be upgraded to is the latest version available 45 days before your scheduled upgrade month. 

In summary, the process for a major release is: 

Timeframe (in relation to the Upgrade Month)

Action

45 days prior (approximately)

Sandbox requests must have been made by us on your behalf and date locked in

30 days prior (approximately)

Sandbox is provisioned if one was requested

2 days prior

Pre-upgrade checks run by MYOB

10pm

Your site is locked and backed up, and upgrades for all sites in that window started

4am

If your site is not upgraded yet or only part way through it will be cancelled, rolled back and rescheduled

6am

Your site will be operational

Day after

We upgrade customisations if applicable

Three days after

Sandbox deleted if one was provisioned

Click for more information on Deployments.

Recommended Month-End Tasks

1. Reporting


1.1 Trial Balance

MYOB Advanced provides two representations of the trial balance. The representation is set in the Sign of the Trial Balance box on the General Ledger Preferences form (GL102000; Finance > Preferences):

  • Normal balance (default): This representation lists all accounts grouped by account type. This representation includes the Year-to-Date Net Income account, which accumulates the company's net income from the start of the current financial year. The Year-to-Date Net Income amount is included in the liability total. The report shows the account balances with their normal sign—that is, for income and liability accounts, the sign of the beginning or ending balance is positive if the account has a positive credit balance; for asset and expense accounts, the sign of the beginning or ending balance is positive if the account has a positive debit balance.
  • Reversed balance: This representation lists all accounts except for the Year-to-Date Net Income account. In this representation, the sign of the beginning and ending balances of liability and income accounts is reversed.

The Sign of the Trial Balance option also affects the data displayed on inquiry forms, such as the Account Summary report (GL632000; Finance > Inquiries).

Complete the following steps to prepare the trial balance for the financial period:

  1. Open the Trial Balance Summary report (GL632000; Finance > Inquiries) and set Financial Period to the current period.
  2. Click Run Report to generate the report for the specified period. By default, the system generates the trial balance that lists the account balances according to the normal balance representation. The accounts that have zero beginning and ending balances are not listed.

1.2 Transactions for Period Report

To review the transactions that updated finance accounts within the specified financial periods, you can use the Transactions for Period form (GL633000; Finance > Inquiries). Complete the following steps to get the list of transactions for the month/year.

  1. Month: On this report form, select the current month in the Start Period and End Period boxes.
  2. Year: To select transactions for all periods of the year, set Start Period to the first financial period of the current financial year (01-XXXX) and the End Period to the last financial period (12-XXXX).
  3. Leave the default values for the other parameters and click Run Report to generate the report for the specified period(s). The system generates the list of transactions that occurred in the selected period(s). The transactions are grouped by finance account.

1.3 Transactions for Account Report

To get the list of transactions for the specified account, you can use the Transactions for Account report (GL633500; Finance Inquiries). Complete the following steps to get the list of transactions posted to an Account in the current period:

1. On this report form specify the following report parameters:

                                Start Period:         Current period

                                End Period:           Current period

                                Account:                Account code you wish to get a list of transactions for

2. Leave the default values for the other parameters and click Run Report to generate the report for the specified account and financial periods. The system generates the list of transactions that have updated the chosen Account during the current financial period.


1.4 Financial Statements

You can prepare the financial statements, which include the balance sheet, the income statement (profit and loss) and the statement of cash flows. You can also customise these reports by using the web-based Analytical Report Manager tool. Your consultant will usually have customised these reports for you during the implementation. Complete the following steps to generate your Financial Statements.

  1. Select the report you wish to run from the Finance > Financial Statements menu
  2. Select the Ledger and the Financial Period (or Period range if applicable) you wish to report on
  3. Select Run Report from the report toolbar

2. Reconciliations

You can reconcile the Inventory, Customer and Vendor account balances by comparing the account balance calculated by the sub-ledger transactions with the account balance calculated by the finance ledger transactions. Reconciliation is a recommended practice before period closing to verify the account balance and the transactions in the sub-ledger account.

2.1 Inventory

  • Reconcile the inventory account balance for a historical period by using the Historical Inventory Valuation summary report (IN617000).
  • Reconcile the inventory account balance for the last activity period by using the Inventory Valuation summary report (IN615500)
  1. Run either of the two reports above
  2. Run the Trial Balance Summary report and find the balance of the Inventory account and check if it agrees
  3. If the balance disagrees, in the Inventory module, you can review the transactions one by one by using the Inventory Transactions by Account form (IN403000). In the Finance module, you can review the transactions
    one by one by using the Account Details form (GL404000) for the same period and inventory account, respectively.
  4. If there is an inventory transaction on the Inventory Transactions by Account form (IN403000), which is missing in the GL account on the Account Details form (GL404000),
    1. Review the inventory transaction and make sure the ledger transaction has been generated for it; the transactions could be not generated if the Update GL box was unticked when the inventory transaction was released.
    2. Review the Post Transactions form (GL502000) to see if there are any Unposted batches of journal transactions, process the needed transactions to eliminate the discrepancy.
  5. If there is a ledger transaction on the Account Details form (GL404000), which is missing on the Inventory Transactions by Account form (IN403000), open the batch of journal transactions and find the source document for it. Depending on the reason why the ledger entry has been directly processed to the inventory account without the processing from the Inventory module, you can correct the ledger transaction, or process the missing inventory transaction in the Inventory module and reverse the generated batch to equate the balance of the inventory account in the modules.
  • When the Validate Inventory Process is Helpful:

This process can be used to recalculate the inventory account balance for periods. Note that this process doesn't affect the on-hand quantity of items in inventory, because this quantity is updated with every released inventory transaction and tracked separately from the inventory account balance. So, the process that you can run on the Validate Inventory form (IN505000) performs the following operations:

1. Recalculates the available quantity and the subtotals by allocation type that are stored in the database and that you can view on the Inventory Summary form (IN401000). This operation is always performed when you run the process on the form.

2. Clears all transaction history for the inventory account in the Inventory module, which you can view in the Historical Inventory Valuation report (IN617000), rebuilds the history again and recalculates the balance of the inventory account in the module by the released inventory transactions. To perform this operation, you select the Rebuild Item History box on the form and specify the start financial period. The system rebuilds the transaction history for each financial period starting from the specified one up to the last activity period in the module.


2.2 Receivables

To complete the Receivables reconciliation, for each GL account used in Receivables documents, you compare the total balance of open documents with the balance of the GL account according to the transactions posted to the account in Finance. The balances must be equal. Before you reconcile the balances, you will review the unreleased Receivables documents, release the needed ones, and delete or edit the other ones, if there are any, because you are going to close the period. You cannot close the period in Receivables if there are unreleased documents that need to be posted to the period.
To complete the reconciliation, do the following:

  1. Review the unreleased Receivables documents and release the needed documents, if there are any, as described below:
    1. On the AR Edit report form (AR611000; Receivables > Reports), specify the from and to period, tick Include Transactions on Hold and click Run Report. For the specified period, the report shows Receivables documents that haven't yet been released—that is, the documents that have the On Hold or Balanced status.
    2. Release any invoices shown in the report. To release an invoice, open the document on the Invoices and Memos form (AR301000) by clicking the reference number link in the report, clear the Hold box and then click Release on the form toolbar.
  2. Reconcile the total of open Receivables documents with the balance of the Receivables GL account as follows:
    1. On the AR Balance by GL Account report form (AR632000; Receivables > Reports), specify the following report parameters and click Run Report:

      Report Format:

      Open Documents

      Financial Period:

      (Period being reconciled)

      Include Applications

      Unticked

      For the specified period, the report shows the Finance accounts used in Receivables documents and the list of documents that have been posted to these accounts and are open at the end of the period.

    2. Obtain the trial balance for the period by using the Trial Balance Summary report (GL632000) located in Finance > Reports.
    3. Compare the balance of the Accounts Receivable account according to the AR Balance by GL Account report (AR632000) and Trial Balance Summary report (GL632000).
      During the reconciliation, you might find a discrepancy between the total balance of open Receivables documents by GL account and the balance of this account according to the trial balance. The discrepancy could be caused by transactions being posted to the GL account directly from the finance module without a document being processed in Receivables. Another possible cause of the discrepancy is the presence of unposted batches generated from Receivables documents. To review the batches that have been released but not yet posted, you can use the Post Transactions form (GL502000; Finance > Processes)

2.3 Payables

To complete the Payables reconciliation, for each GL account used in Payables documents, you compare the total balance of open documents with the balance of the GL account according to the transactions posted to the account in Finance. The balances must be equal. Before you reconcile the balances, you will review the unreleased Payables documents, release the needed ones, and delete or edit the other ones, if there are any, because you are going to close the period. You cannot close the period in Payables if there are unreleased documents that need to be posted to the period.

To complete the reconciliation, do the following:

  1. Review the unreleased Payables documents and release the needed documents if there are any, as described below:
    1. On the AP Edit report form (AP610700; Payables > Reports), specify the from and to period, tick Include Transactions on Hold and click Run Report. For the specified period, the report shows Payables documents that haven't yet been released—that is, the documents that have the On Hold or Balanced status.
    2. Release any documents shown in the report. To view the bill, click the reference number of the bill in the report. On the Bills And Adjustments form (AP301000) that opens for the bill, clear the Hold box and click Release on the form toolbar.
  2. Reconcile the total of open Payables documents with the balance of the Payables GL account as follows:
    1. On the AP Balance by GL Account report form (AP632000; Payables > Reports), specify the following report parameters and click Run Report:

      Report Format:

      Open Documents

      Financial Period

      (Period being reconciled)

      Include Applications:

      Unticked

      For the specified period, the report shows the Finance accounts used in Payables documents and the list of documents that have been posted to these accounts and open by the end of the period.

    2. Obtain the trial balance for the period by using the Trial Balance Summary report (GL632000) located in Finance > Reports.
    3. Compare the balance of the Accounts Payable account according to the AP Balance by GL Account report (AP632000) and Trial Balance Summary report (GL632000). During the reconciliation, you might find a discrepancy between the total balance of open Payables documents by GL account and the balance of this account according to the trial balance. The discrepancy may be caused by transactions being posted to the GL account directly from the finance module without a document being processed in Payables. Another possible cause of the discrepancy is the presence of unposted batches generated from Payables documents. To review the batches that have been released but not yet posted, you can use the Post Transactions form (GL502000; Finance > Processes)

2.4 Banking

Ensure all banking transactions have been reconciled for the full month using the same Bank Reconciliation process that is part of your day-to-day processes.


3. GST Return

After confirming all transactions have been entered/released and the AR and AP financial periods are closed:

  1. Prepare Tax Report
    1. On the Prepare Tax Report form (TX501000; Taxes > Processes) choose the Tax Agency as IRD.
    2. The tax period will default to the next Open period.
    3. The Taxable Amounts and Tax Amounts for each % category will be shown on the screen with the Net Tax to pay/refund at the bottom.
    4. Select ‘Prepare Tax Report’ to be taken to the next screen
    5. IMPORTANT: Do not select Release Tax Report until step 2 has been completed
  2. Reconcile Tax Report
    There are two reports which can be used to reconcile your GST amounts
    1. Run the Tax Summary Report (TX621000; Taxes > Reports) by selecting the Tax Agency and Tax Period (the period status will be Prepared). The report will show the Taxable and Tax Amounts in report format along with the Net Tax and can be saved or printed
    2. Run the Tax Details Report (TX620500; Taxes > Reports) by selecting the Tax Agency and Tax Period (the period status will be Prepared). The report displays the individual transactions making up the total amounts.
    3. Use these reports to ensure all transactions have been included and agree to your GL accounts and financial reports. Investigate/release any missing transactions.
    4. If you need to add/amend transactions, select Void Report from the Release Tax Report screen and then repeat the steps above to Prepare a new Tax Report.
  3. Release Tax Report - Do not complete this step until you have reconciled your figures as it cannot be reversed.
    1. On the Release Tax Report form (TX502000; Taxes > Processes) select the Tax Agency and Tax Period
    2. Once the Tax Report is released it cannot be voided, reversed, or edited. A revision would need to be created (if your IRD supplier has the Update Closed periods option ticked) and adjustments created. Speak to your consultant if you end up in this situation.
    3. Select the Release function to close the tax period and optionally generate an AP Bill for the IRD supplier if that option is ticked on the supplier.
  4. Generate GST Return report
    1. From the Goods and Services Tax Return (GST101A) form (TX6000 Taxes > Reports) select the Tax Agency and Tax Period and Run report
    2. The GST form will be displayed and can be Sent or Exported from this screen.

It is important that all transactions are entered, and the tax report is reconciled prior to the Release Tax Report step as this closes the Tax Period (and optionally creates the vendor bill on the IRD Supplier if this option is selected).  Because of this, no more transactions are included for the tax period of the Tax Report because the next step is filing the return.  Ideally, you would carry out the Release Tax Report step immediately prior to filing the GST return.  The Financial periods can remain open if you are willing to accept more invoices for your financial reporting figures but for GST purposes, they move to the next open Tax period and are reported then.  This leads to reconciliation differences though so, to keep them reconciled, we would recommend you close the AR and AP financial periods and then Prepare your Tax Report.

The Release Tax Report form does pop open when the Prepare Tax Report is run which does make it easy to click Release before it is ready.  Just close this form and go back to it later.

4. Close/Lock Financial Periods


4.1 Closing a Financial Period

Periods can be closed at a sub-ledger level or at the Finance Module level. For example, if you have created all customer invoices and finished the bank reconciliation then you can close the Receivables and Banking modules but then leave the Payables Module open while still processing Vendor Bills. Closing the periods at a Finance Module level closes them for all the sub-ledger modules too.

Once you have posted all the necessary transactions to a financial period and verified the reports, you can close the financial period. Financial periods in MYOB Advanced have one of four statuses.

  • Inactive
  • Open
  • Closed
  • Locked

Each status applies to a range of periods; if a user closes a period, all the periods that precede it are assigned the same Closed status. There may be four period ranges with different statuses: Locked, Closed, Open, and Inactive. The status Locked prevents changes to the data that has been verified and disclosed in reports. A locked period cannot be used by a validation process, for data entry, or for posting in any subledgers. Before closing or locking periods, the system checks for any unposted transactions in these periods.

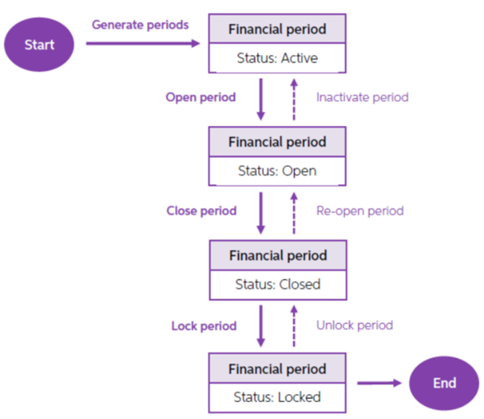
The following diagram illustrates the states of financial periods and the actions that can be performed on financial periods.

finperiods
Financial periods can be closed/locked starting from the first period of the first financial year. You can close/lock multiple periods at once (for instance, all periods of a year).

To be able to close a financial period in a sub-ledger module (Inventory, Receivables, Payables, Fixed Assets, Banking), you do the following

  1. On the Close Financials Periods form (nn509000; Module > Processes), select the current financial period and click Unreleased Documents on the form toolbar.
    The Unreleased Documents report shows transactions that have the On Hold or Balanced status in the system and haven’t been processed yet. Review each unprocessed transaction on the report and either release or remove it or change the post period in the transaction so that the report is empty for the periods that you are going to close. You cannot close a financial period in the sub-ledger modules until there are no unprocessed transactions in this period in the module.
  2. Once there are no remaining unprocessed transactions, select the financial period to be closed and select Process from the form toolbar.

To be able to close a financial period in the Finance module, you do the following

  1. Make sure the previous period is closed in the finance module.
  2. Make sure you have no batches with statuses On Hold, Balanced or Unposted in the period you are going to close from the Unposted Documents tab. After that, you can close the financial period in the finance module. Once the period is closed in the finance module, the system generates the auto-reversing batches to the next period if Generate Reversing Entries is set to On Period Closing on the General Ledger Preferences form (GL102000).
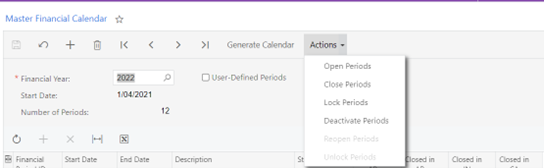
    Complete the following steps:
  3. Go to Manage Financial Periods form (GL503000; Finance > Processes) and select Action Close.
    manageperiods
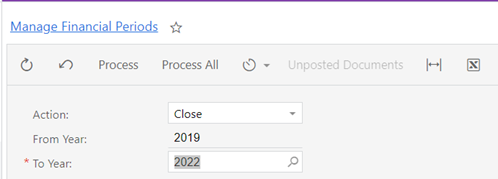
  4. Select the current year as the To Year, select the period(s) to be closed in the table below then select Process from the form toolbar or alternatively select Process All to close all periods for the year. A popup box will appear advising that the periods will be closed in Accounts Payable, Accounts Receivable, Cash Management, Inventory and General Ledger.
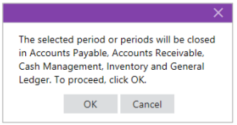
    box
  5. Click on OK.
  6. To Lock Periods, perform the same steps but select Action as Lock instead.

With the support for company-specific calendars, users can now activate and deactivate financial periods for posting for a particular company and can close books separately in each company within the tenant.

On the User Roles screen (SM201005), the Financial Supervisor role can safely post to closed periods while all other users cannot work with those periods, i.e. when the Restrict Access to Closed Periods check box is selected on the General Ledger Preferences screen (GL102000). Users assigned to this role can reopen closed periods and unlock locked periods if needed. Care should be taken with posting into closed periods knowing this will affect distributed reports or filed GST returns. Once done, locking a period will prevent further data changes by any user role.

4.2 Closing a Financial Year

To close a financial year in the system, you close the last financial period of the year in the Finance module. Once the year is closed, the system updates the Retained Earnings account with the amount accumulated on the YTD Net Income account. No closing entries are recorded. Regardless of year closing, the system always transfers the balances of the balance sheet accounts to the next period and sets the beginning balances of the income statement accounts and YTD Net Income equal to zero in the first period of each financial year.

The system automatically tracks changes on the YTD Net Income account throughout financial years. Thus, if you later post a transaction that affects the YTD Net Income account in a closed year, the Retained Earnings account will be automatically updated in the financial periods of the next years.

4.3 Generating a New Financial Year

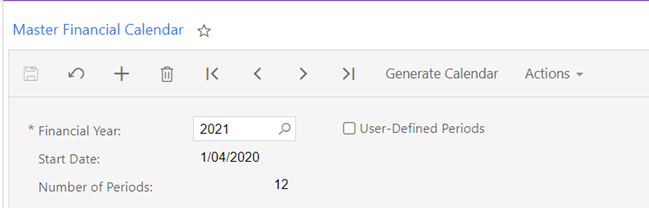
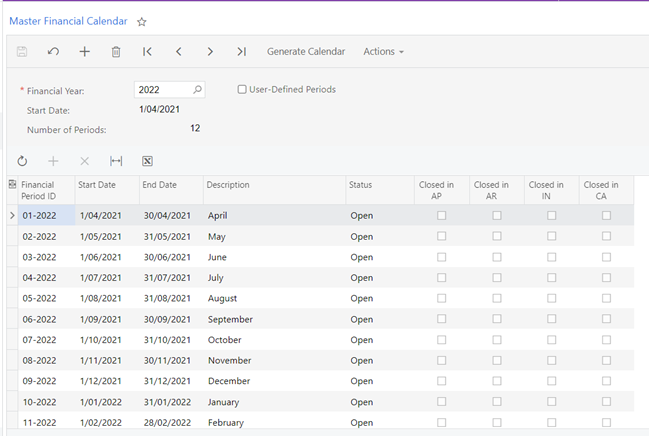
To define and generate financial periods in the system, open the Master Financial Calendar form (GL201000; Finance Profiles) and do the following:

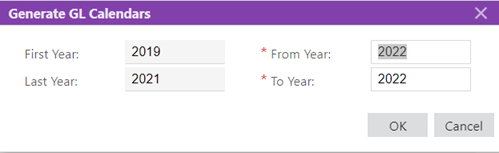
  1. Set the Financial Year to the current year, click the Generate Calendar button from the toolbar.
    masterfincalendar
  2. From the pop-up window, specify From Year and To Year as the new year and then click OK to generate the financial periods.
    generateglcalendar
    You have defined financial periods for the new year. However, the financial periods are not yet active; in the next step, you activate the needed periods.
  3. In the Finance module, you activate the financial periods that you have generated. Once activated, a financial period can be used in finance and other modules of MYOB Advanced. Transactions can be entered and posted to only active financial periods. To activate all periods in your new year, do the following:
    1. On the Master Financial Calendar form (GL201000), select the new Financial Year
    2. From the Actions button on the toolbar, select Open Periods.

    actionsperiod
    manageperiods22
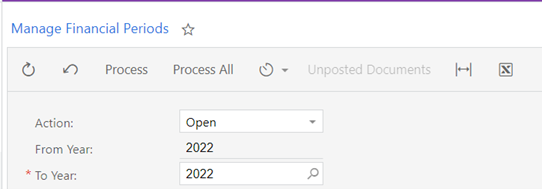
    1. From the new window, Manage Financial Periods (GL503000; Finance > Processes), select the below –
      Action: Open
      From Year: your new year
      To Year: your new year
    2. Click Process All from the toolbar
      The processing window will display details of the records processed. In case of errors or warning, the details will appear under the processing window.

 processing

calendar

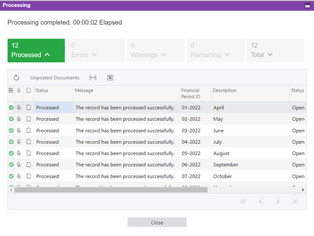
At any time, you can have multiple active periods; activating a period doesn’t require closing a previous one. Now all periods of your new year are active and open, and you can enter and post transactions to any financial period in this year.

Basic Elements of the MYOB Advanced Interface

Every MYOB Advanced screen includes basic elements that users use for navigating the system, viewing and managing data, and performing other basic functions. The following screenshot shows a typical MYOB Advanced screen in the user interface with the basic elements that appear on it.

Images_UIG_Modern_UI_Basic_Elements


1. Home button

When you click the Home button, which has the MYOB Advanced logo on it and is located in the top left corner of the top pane of the MYOB Advanced screen, you are forwarded to the home page of your instance. You can specify a custom home page that will be opened instead of the default home page. 

The Home button is displayed on the top pane only if the main menu panel is shown on the left side of the screen. If the main menu is minimised, you see the Menu button instead of the Home button.

By using the Search box on the top pane of the MYOB Advanced screen, you can search for a text string in menu items, form titles, help topics, files, notes, and entities that have been created using system forms, such as suppliers, customers, prospects, employees, leads, and cases. Additionally, you can search for a form by its title and by its ID. For details, see Search.


If a link to a form, report, or dashboard has not been added to any workspace, you cannot find this form or report by using the Search box in the top pane of the MYOB Advanced screen.


3. Recently Viewed button

By using the Recently Viewed button, you can easily navigate to the records you have recently used (or viewed) if you need to work with them again. The system stores up to 500 records that have been viewed. When you click the Recently Viewed button, the system displays a workspace with the following lists: Record TypesRecordsFavourite Records. For details, see Recently Viewed.

4. Company and branch selection menu

You can switch between companies and branches by clicking the company and branch selection menu on the top pane of the MYOB Advanced screen. When you click the selection menu, you can view the list of companies and their branches that you have access to. To switch to a particular company or branch, you click the name of the company or branch. If you have more companies and branches than the system can display, you can use the search box that is also a part of the selection menu. For more information, see Company and Branch Selection Menu.

5. Info area

The info area, in the upper-right corner of the top pane of the MYOB Advanced screen, contains the menus and buttons that you can use to sign out from the system, change the settings of your account, and change the business date. For more information, see Info Area.

6. Main menu (displayed as a panel)

The main menu in MYOB Advanced contains the links to your favourites and workspaces (menus with links to forms and reports). By default, the main menu is a panel located on the left side of the MYOB Advanced screen. You can minimise the menu so that it is displayed as a button in the top left corner of the screen (instead of the Home button). For details, see Main Menu.

When you click a workspace item on the main menu, the workspace menu opens. This menu contains the forms and reports dedicated to a particular functional area. 

7. Working area

The working area, which is the large area on the right side of the screen, may display any of the following:

  • Form: MYOB Advanced has forms of multiple types. 
  • Report: A report is a type of a form specifically designed to organise data in a presentable format, as described in Reports.
  • Dashboard: A dashboard is a collection of widgets, displayed on a single page, that give you needed information at a glance. 
Work with MYOB Advanced on Mobile Devices

If you use MYOB Advanced in a browser of a mobile device, the main menu becomes minimised. In the minimised menu, you can see the icons and the titles of the links to workspaces. To open a workspace, you tap the needed link on the main menu. On the workspace, you can open any entity provided there by doing one of the following:

  • To open a form in the same window, tap the link.
  • To open a form with the main menu and header available in a new tab, long-press the link and select Open in new tab.
  • To open only a form with no main menu or header available in a new tab, long-press the link and select Open in new window.
 

For maximum usability of the system on a mobile device, we recommend that you use the Advanced OnTheGo mobile app.

Using the Search Functionality

Searching in MYOB Advanced gives you the ability to quickly open a form (or a record on a form), find a file, find a help topic, or find a record in a recently viewed list of records. This topic contains information on performing searches in the user interface of MYOB Advanced.

Search Workspace

To begin a search, you type a text string in the Search box. (You can use the Ctrl+Q keyboard shortcut to place the cursor in the Search box.) The system opens the Search workspace in the working area, on top of the page (such as a dashboard or a form) that was opened when you started your search. The workspace is shown in the following screenshot.

Images_UIG_New_UI_Search_Form

  1. Search filter tabs
  2. Search results

You can look through the search results on the Search workspace and go back to the page you had opened before you performed the search. For example, you can start to enter data on some MYOB Advanced form, search for some information, and then go back to the form and continue to enter data because your previous changes have been preserved.

Search Filter Tabs

By default, the search in MYOB Advanced is performed in form and report names. You can switch to one of the search filter tabs to change the scope of the search. The following tabs are available:

  • Menu Items: On this tab, you can scan for specific forms or reports by name or ID.
  • Transactions and Profiles: On this tab, you can look for specific system records, such as customers, suppliers, prospects, employee accounts, and notes attached to records.
  • Help Topics: This tab lists search results in all guides and help topics. When you click a link to a Help topic, the topic is opened in a separate tab of a browser. If you want to open the Help topic over the working area, you should press Ctrl and click the link.
  • Files: On this tab, you can view files attached to system records.

When you type a text string in the Search box and switch between the search filter tabs, your text string is preserved, and search results are automatically displayed for this text string.

Search in the List of Recently Viewed Records

When you open the Recently Viewed workspace, you might see an enormous number of records, because the system keeps up to 500 of the most recently viewed records in the Recently Viewed workspace. If you know the key information about the record you are searching for—, like the name or the number of a record, or any information from the record description—you can search for this record by using the standard MYOB Advanced search functionality. If you perform this search when the Recently Viewed workspace is open, the search is performed only among the records on this workspace. If this workspace is closed, then the system runs the system-wide search and displays all records that correspond to the user search request.

Images_UIG_New_UI_Search_in_Recently_Viewed

Search Results

In MYOB Advanced, an intelligent search is implemented. The system performs a flexible search, considering all possible forms of the text string that you have entered in the Search box, and then lists the search results from the most relevant to the least relevant. 


If you have searched by entering the name of an MYOB Advanced entry form that has a substitute form, the form name with a link to the substitute form (rather than the entry form) is displayed in the search results, but the entry form is not. When you use the form ID to search for the entry form, the system does not display a link to this entry form in the search results. You can open the entry form by using the substitute form.

The system narrows the search results based on the access rights of the user who performs the search. If you don’t have permissive access rights to particular data (such as supplier accounts), these objects do not appear in the search results, even though they match the search criteria. Your access rights to file attachments are determined by your rights to the entities to which the files are attached.

Search Tips

Keep the following tips in mind when you use the search capabilities in MYOB Advanced:

  • To search for all possible forms of a particular word or phrase, you type it as is without any additional characters. For example, if you type invoice in the Search box, the system displays all strings that contain invoice, invoices, and invoiced.
  • To search for an exact match of a particular word or phrase, you enclose it in quotation marks. For example, if you type “Western Star Trucks” in the Search box, the system returns only the customer with this exact name.
  • To search for a particular string everywhere in the system (in form names, help topics, system entities, and files), you type the string in the Search box and then switch to each of the filtering tabs.

The built-in Help is provided with the MYOB Advanced instance. Topics in the built-in Help are relevant to the version of the MYOB Advanced instance in use and are not updated until the instance is updated.

Unlike built-in Help topics, online Help topics are regularly updated to the latest version of MYOB Advanced, and online Help contains the newest topics. The search functionality in online Help also takes into account the relevance of topics to the search term. 

By default, the online Help search functionality is not turned on. To turn it on, you select the Use Online Help System check box on the Site Preferences (SM200505) form.


Currently, the online Help functionality is available for only MYOB Advanced instances in a public cloud.

When the Use Online Help System check box is selected on the Site Preferences (SM200505) form, the search results for the Help topics are displayed as shown in the following screenshots.

Images_UIG_ML_Help_UI

Images_UIG_Help_UI_Link_Article

  1. Topic preview box: This box displays a preview of the topic that the system has determined is the most relevant.
  2. The Show Full Version button: The user can click this button at the bottom of the preview box to open the whole topic in a preview box. If the user clicks the Show Full Version button, the preview box is enlarged and the Open this article at Help Portal button appears, as shown in the second screenshot above.
  3. Feedback section: The user can leave feedback by selecting Yes or No right of Was this helpful? in the preview box of the topic.
  4. Other topics: The system displays the other topics that are relevant to the search string.
  5. The Open in new tab button: This button (shown in the second screenshot above) appears only if the user has clicked the Show Full Version button in the preview box or the topic itself was short. When the user clicks this button, the system navigates to the full version of the topic, opening the online Help in a new browser tab.

Using the Recently Viewed Feature

In fast-growing companies, it is important to organise employees’ work so that all the needed information is at hand. This makes the work processes run smoothly and quickly. In MYOB Advanced, you can easily access the recently viewed records because the system stores the records you have recently accessed.

The recently viewed functionality is specific to each individual user. The system keeps the last 500 records you have interacted with and displays them in the Recently Viewed workspace, which appears when you click the Recently Viewed button. The system stores only those records that have been created and opened on data entry forms. The frequently viewed records are placed at the top of the list so that you can have easy access to them.

The Recently Viewed Button

To open the workspace showing your recently viewed records, you click the Recently Viewed button, which is located right of the Search box, as shown in the following screenshot. Each time you click the button, the system uses the data it has collected and refreshes the workspace to show the most recently used records.

Images_UIG_Recently_Viewed_Button

Clicking the button opens the Recently Viewed workspace (see the following screenshot), which is placed over the working area of the screen.

Images_UIG_Recently_Viewed_Workspace

This workspace includes the following lists:

  • Record Types: This list can be used to filter records by their type. By default, the system displays all records (the All record type). If needed, a user can select another record type to view records of only the selected type in the Records and Favourite Records lists. Record types are predefined, and the system adds the appropriate record types to the Recently Viewed workspace automatically each time a user opens the workspace.
  • Records: This list displays the last 500 records the user has interacted with. If the user has selected a record type other than All, the system filters the records and displays in this list only records of the selected record type.
  • Favourite Records: This displays the records the user has marked as favourites for easy access to them, regardless of when they were last accessed.
 

If a user changes a locale and opens the Recently Viewed workspace, Record Types, Records, and Favourite Records will list localised content, including records with localised names from the locale that the user has opened these records before.

Favourite Records

When a user works with specific records frequently, the user can add them to Favourite Records in the Recently Viewed workspace. This won’t remove them from the Records list; the record will be listed under both Records and Favourite Records.

To add a record to the list of favourite records, in the Records list, the user should hover over the needed record, and when the star icon appears, click the icon. The yellow colour of the star indicates that the record has been added to the list of favourites. (The user needs to refresh the workspace to reflect these changes.)

Images_UIG_Recently_Viewed_Favorites

Search for the Recently Viewed Records

You can utilise the standard Search functionality to search among the recently viewed records. When the Recently Viewed workspace is open, the system runs the search only among the last 500 records you have interacted with. If this workspace is closed, then the system runs the system-wide search and displays all records that correspond to your search request.

Images_UIG_New_UI_Search_in_Recently_Viewed


Company and Branch Selection Menu

In MYOB Advanced, you can switch between the companies and branches defined in the instance by using the company and branch selection menu of the user interface. This selection menu contains the list of companies and branches that you have access to.

By using this selection menu, shown in the screenshot below, you can view the total number of accessible companies and branches, and easily navigate to the needed one by clicking it. If the number of accessible companies and branches exceeds the number that can be displayed on the company and branch selection menu, you can search for the needed company or branch in the Search box of this selection menu.

Images_UIG_Modern_UI_Company_Branch_Selector

  1. Company or branch name: Displays the name of the company or branch (or both) to which you are currently signed in
  2. Search box: Is used to search for a particular company or branch by its name, as described below
  3. List of companies or branches (or both): Displays the list of the companies and their branches (if any) to which you have access
  4. Company and branches counter: Displays the total number of companies and the total number of branches to which you have access
Switching Between Companies and Branches

To switch between the companies and branches that you have access to, you use the company and branch selection menu. You click the selection menu on the top pane of any screen, and then click the name of the company or branch to which you want to sign in.

If a company has multiple branches, you can switch to its branches only. The company name is unavailable for selection in that case.

The selected company or branch is printed in blue and has a cheque mark left of its name.

 
Searching for a Company or a Branch

The company and branch selection menu can display a limited number of the companies and branches due to size and design limitations. If you have access to multiple companies and branches but the selection menu doesn’t display a company you want to access because of insufficient space in the selection menu, you can search for the specific company or branch by its name.

You search for a company or a branch by typing its name in the search box of the selection menu. The system initiates the matching process and displays the search results as soon as you begin typing in this box.

The Information Area

The info area, in the right corner of the top pane on the MYOB Advanced screen in the user interface, includes a group of menus and buttons, as shown in the screenshot below. These menus and buttons communicate the status of your user account in the system and provide access to certain settings.

Images_UIG_Modern_UI_Info_Area

  1. Business Date menu button
    By default, in MYOB Advanced, any user can change the business date by clicking the Business Date menu button and then selecting the needed date. If the Secure Business Date feature is enabled on the Enable/Disable Features (CS100000) form, only users with the BusinessDateOverride role assigned to them can change the business date. The business date is the date that the system will insert by default on the records that you add to the system. By default, the current date is set as the business date. If you set a different date as the business date, this date will be used as the default date on MYOB Advanced forms and on documents that you create by using the forms. 
  2. Help button
    By clicking the Help button, you can open the Help menu, which overlaps with the working area. The content of this menu depends on the item displayed in the working area when you click this button. 
  3. User menu button
    The User menu button displays your first and last name, and the name of the tenant to which you signed in if multiple tenants are configured in your MYOB Advanced instance. The following screenshot shows the items of the User menu.
    Images_UIG_Modern_UI_User_Menu

    The User menu includes the following sections:

    1. Tenants
    2. My Profile
    3. Sign-In

    The Tenants section of the User menu contains the list of tenants to which you can sign in if multiple tenants are configured in your MYOB Advanced instance. The tenant you are currently signed in to is indicated with a cheque mark. You can switch to a different tenant by clicking the tenant name. 

    The My Profile section contains your user name, your email address, and the My Profile button, which you click to open the User Profile (SM203010) form. 

    The Sign-In section contains the date and time of your last sign-in to the system and the Sign Out button, which you click to sign out of the system. 

MYOB Advanced Help

In the user interface of MYOB Advanced, you can click the Help button (top right) to view relevant Help information. The specific Help information you view depends on the item displayed in the working area when you click this button, as follows:

  • If the working area is displaying a form other than a data entry form or mass-processing form, the Help dashboard, which contains cards with descriptions of guides and links to them, is opened in a separate tab of a browser. 
  • If the working area is displaying an MYOB Advanced form, the Help menu specific to this form appears over the working area. The Help menu contains links to the conceptual, procedural, and reference topics that are related to the form. 
  • If the working area is displaying a dashboard, the Help menu appears over the working area and displays links to the conceptual, procedural, and reference topics that are related to dashboards. 
  • If the working area is displaying a report, the reference topic that describes this report is opened in a separate tab of a browser.

The Help menu covers part of the working area. You can come back to the page that had been displayed in the working area by clicking the Help button again. The Help dashboard and Help topics are opened in separate tabs of a browser. If you want to open the Help dashboard and Help topics over the working area, you should press Ctrl and click the Help button.

The Main Menu

The main menu in the user interface of MYOB Advanced, shown in the following screenshot, includes the Favourites menu item, the workspace menu items, the More Items menu item, the configuration menu, and the Collapse or Expand button.

Images_UIG_New_UI_Main_Menu

  1. Favourites menu item
  2. Workspace menu items
  3. More Items menu item
  4. Configuration menu
  5. Collapse or Expand button

You click the Favourites menu item to view your favourite forms. You click this item to open the list of your favourites.

You click each of the workspace menu items to view the forms and reports of that workspace, which is a particular functional area. If you need to open the current workspace (which is highlighted in the main menu), you can press Alt+G. By default, the most commonly used workspaces are represented with menu items on the main menu; you can add workspace menu items to the main menu or remove existing menu items. 

When you click the More Items menu item, a menu is opened with tiles, grouped by broader functional areas, that represent all of the possible workspaces. You can pin any of these workspaces to the main menu by pointing to the workspace tile and clicking the Pin button.

The configuration menu contains commands that you click to configure the location of the main menu and to edit the menu items in the whole system (if you are signed in to an account with the Administrator role assigned). The menu commands are listed in the following table. 

Command Description
Collapse to Top Collapses the main menu panel and adds the Menu button in the top left corner of the screen (instead of the Home button with the MYOB Advanced logo). When the main menu is collapsed, the work area expands to cover the area where the main menu had been.
This menu command is displayed only when the main menu panel is shown on the left side of the screen.
Expand to Left Displays the expanded main menu panel on the left side of the screen.
This menu command is displayed only when the main menu is collapsed and the Menu button is shown in the top left corner of the screen.
Edit Menu Switches the system to Menu Editing mode. In this mode, authorised users can customise menu items for the whole system.
This menu command is displayed only to users with a role specified in the Menu Editor Role box on the Security Preferences (SM201060) form.

By clicking the Collapse button, you can collapse the main menu panel so that it displays only icons, and by clicking the Expand button, you can expand the panel to the full width. By clicking these buttons, you can change the width of the main menu pane when the menu is in both locations—expanded on the left and collapsed to the top.

Editing the Menu

In the user interface of MYOB Advanced, you open Menu Editing mode (see the following screenshot) by clicking the Edit Menu menu command on the configuration menu of the main menu. The Edit Menu menu command is available only to users with a role specified in the Menu Editor Role box on the Security Preferences (SM201060) form. For details, see Customising the User Interface.

Images_UIG_Edit_Menu_Mode

The buttons that appear in Menu Editing mode are described in the following table.

Buttons of Menu Editing mode
Button Description
Add Workspace Opens the Workspace Parameters Dialog Box with the boxes blank so you can specify these parameters and add a workspace to the UI.
Add Menu Item Opens the Select Forms Dialog Box for the selected workspace.
The button is available when you first select a workspace in Menu Editing mode.
Add Tile Opens the Tile Parameters Dialog Box with the boxes blank so you can specify these parameters and add a tile to the selected workspace.
The button is available when you first select a workspace in Menu Editing mode.
Menu Settings Opens the Menu Settings menu.
Exit Edit Menu Saves your changes and exits Menu Editing mode.

Frequently Asked Questions

Visit our FAQs page for more answers about moving to MYOB Advanced.

AdvancedERP

Are you ready to take your business to the next level? Look no further than MYOB Advanced ERP

Our team of experts is ready to guide you through every step of the process, from initial setup to ongoing maintenance. Don't let the fear of change hold you back.

Contact us today to learn how MYOB Advanced ERP can transform your business.