MYOB Acumatica Videos and Help
TABLE OF CONTENTS
Our support team steps in after you “go live” with MYOB Acumatica. When choosing Avanza Solutions for your everyday support queries, you will have access to a highly trained MYOB Certified team who are solution driven.

MYOB Acumatica Videos
Access all our free training and support video content on our YouTube channel.
.png?width=300&name=mediamodifier_image%20(26).png)
Excel Reporting & Budgeting for MYOB Acumatica
Helpful resources to get you started with MYOB Acumatica
MYOB Acumatica Academy
First head over to MYOB Acumatica Academy where you can watch Introductory videos on MYOB Acumatica which is linked to the MYOB Acumatica Help Centre.
Online Knowledge Base
Whether you are about to start implementation or are ready to go live, you can find articles and technical white papers with detailed product information in the knowledge base.
MYOB Academy
Continue your learning journey by enrolling in MYOB training courses at the MYOB Academy. MYOB Academy is a Learning Platform and is a constantly developing resource that can be used to learn how to utilise your MYOB software.
Community Forum
You can register to be part of the MYOB community and chat with like-minded peers
Click here to access the community forum.
MYOB Acumatica Mobile App
Access MYOB Acumatica Business anywhere, any time on any device with an easy-to-use mobile app.
YouTube Playlist
You can also find a number of short videos demonstrating the MYOB Acumatica functionalities here: MYOB Acumatica Business
MYOB Acumatica Upgrades
MYOB is responsible for upgrading your MYOB Acumatica system. The upgrade itself is covered as part of your license agreement with them. If you need assistance with pre-upgrade testing or have questions following the upgrade, then Avanza Solutions is there for you and this activity is a standard consulting service which we can provide a quote for or work on a time and materials basis.
There are four types of Upgrade releases that could be applied to your system. These are:

Cohorts
Major release upgrades are deployed to your site twice a year based on Cohorts meaning your two upgrades will be 5 months apart. Your site will be automatically added to the Cohort in the month your site is provisioned so your first upgrade will be 5 months after that. There are no upgrades in December or January, so the 5 cohorts are as per the below.
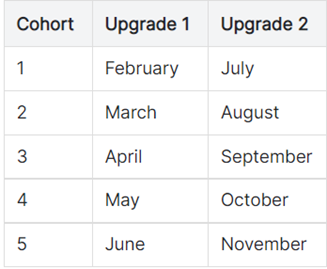
You can opt-out of one of the two major upgrades per year but not both. Cohorts are fixed at the beginning of the year, and you are unable to move between them once set for the year.
Each month has 4 upgrade windows, and we can move you between those windows if a particular date works better for you that month. These windows are locked in approximately 45 days before the first day of the cohort month.
In-App Notifications
MYOB provides in-app communication to users set to receive the notifications pertaining to upgrades. This will include information on:
-
What to Expect
-
What’s changed (including Release Notes)
-
How to prepare and Sandboxes
-
Upgrade Preparation Tasks
-
Post Upgrade Survey
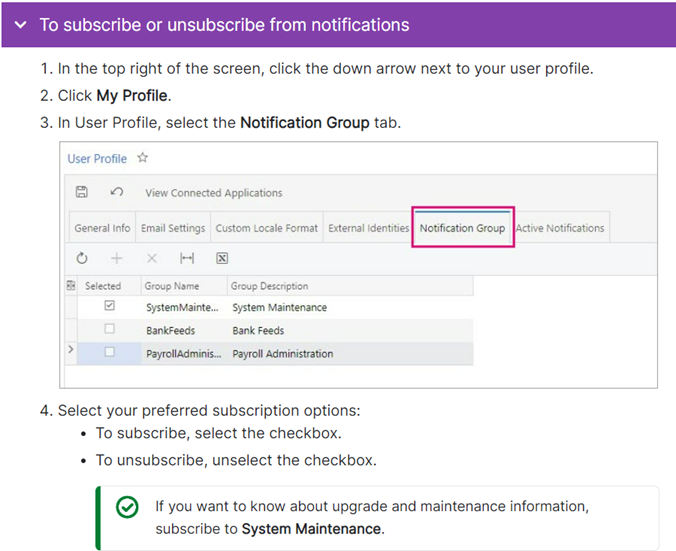
The instructions for adding yourself to the Notification Group for upgrade and maintenance information are below or click for more information on In App Notifications.
Sandboxes
A sandbox is a testing environment taken from a copy of your production system. Sandboxes for Major Releases are provided free of charge approximately 30 days before your upgrade month and expire three days after your upgrade. Sandboxes you request for other release types or for your own testing outside of a major upgrade are charged on a per-month basis.
Sandboxes are not mandatory for a major upgrade but we highly recommend one and so we always request it on your behalf approximately 45 days before the first day of the cohort month. They are accessed via a separate URL address which will be advised to you once it is available. Your user login details will be the same as your production system.
Testing and Support
We highly recommend testing your core business functionality and any customisations your site has once you receive your sandbox. This is especially important for a major upgrade with a lot of introduced functionality. We are happy to work with you to devise a training plan that best suits your organisation adding in anything that is unique to you. If you find an issue during your testing, please email screenshots to either your lead consultant or the support email. We are also able to assist you with testing or go through the test plans for you and can provide a quote for that.
Release Notes as to what is included in each deployment are provided either in your In-App notifications or by using this link MYOB Acumatica Release Notes. You can find the current version of your system at the bottom of the login screen to know which version you are moving from.
Upgrade Process
Upgrades start at 10 pm on your assigned date with the system back up by 6 am the next morning. If an upgrade fails for some reason or is not going to be completed by 6 am then MYOB will restore to your current version and reallocate your upgrade to a new window. If you have customisations, then Verde may need to republish them for you on the morning after the upgrade, and your consultant will work with you on that.
The version you will be upgraded to is the latest version available 45 days before your scheduled upgrade month.
In summary, the process for a major release is:
|
Timeframe (in relation to the Upgrade Month) |
Action |
|
45 days prior (approximately) |
Sandbox requests must have been made by us on your behalf and date locked in |
|
30 days prior (approximately) |
Sandbox is provisioned if one was requested |
|
2 days prior |
Pre-upgrade checks run by MYOB |
|
10pm |
Your site is locked and backed up, and upgrades for all sites in that window started |
|
4am |
If your site is not upgraded yet or only part way through it will be cancelled, rolled back and rescheduled |
|
6am |
Your site will be operational |
|
Day after |
We upgrade customisations if applicable |
|
Three days after |
Sandbox deleted if one was provisioned |
Click for more information on Deployments.
Recommended Month-End Tasks
1. Reporting
1.1 Trial Balance
MYOB Acumatica provides two representations of the trial balance. The representation is set in the Sign of the Trial Balance box on the General Ledger Preferences form (GL102000; Finance > Preferences):
- Normal balance (default): This representation lists all accounts grouped by account type. This representation includes the Year-to-Date Net Income account, which accumulates the company's net income from the start of the current financial year. The Year-to-Date Net Income amount is included in the liability total. The report shows the account balances with their normal sign—that is, for income and liability accounts, the sign of the beginning or ending balance is positive if the account has a positive credit balance; for asset and expense accounts, the sign of the beginning or ending balance is positive if the account has a positive debit balance.
- Reversed balance: This representation lists all accounts except for the Year-to-Date Net Income account. In this representation, the sign of the beginning and ending balances of liability and income accounts is reversed.
The Sign of the Trial Balance option also affects the data displayed on inquiry forms, such as the Account Summary report (GL632000; Finance > Inquiries).
Complete the following steps to prepare the trial balance for the financial period:
- Open the Trial Balance Summary report (GL632000; Finance > Inquiries) and set Financial Period to the current period.
- Click Run Report to generate the report for the specified period. By default, the system generates the trial balance that lists the account balances according to the normal balance representation. The accounts that have zero beginning and ending balances are not listed.
1.2 Transactions for Period Report
To review the transactions that updated finance accounts within the specified financial periods, you can use the Transactions for Period form (GL633000; Finance > Inquiries). Complete the following steps to get the list of transactions for the month/year.
- Month: On this report form, select the current month in the Start Period and End Period boxes.
- Year: To select transactions for all periods of the year, set Start Period to the first financial period of the current financial year (01-XXXX) and the End Period to the last financial period (12-XXXX).
- Leave the default values for the other parameters and click Run Report to generate the report for the specified period(s). The system generates the list of transactions that occurred in the selected period(s). The transactions are grouped by finance account.
1.3 Transactions for Account Report
To get the list of transactions for the specified account, you can use the Transactions for Account report (GL633500; Finance Inquiries). Complete the following steps to get the list of transactions posted to an Account in the current period:
1. On this report form specify the following report parameters:
Start Period: Current period
End Period: Current period
Account: Account code you wish to get a list of transactions for
2. Leave the default values for the other parameters and click Run Report to generate the report for the specified account and financial periods. The system generates the list of transactions that have updated the chosen Account during the current financial period.
1.4 Financial Statements
You can prepare the financial statements, which include the balance sheet, the income statement (profit and loss) and the statement of cash flows. You can also customise these reports by using the web-based Analytical Report Manager tool. Your consultant will usually have customised these reports for you during the implementation. Complete the following steps to generate your Financial Statements.
- Select the report you wish to run from the Finance > Financial Statements menu
- Select the Ledger and the Financial Period (or Period range if applicable) you wish to report on
- Select Run Report from the report toolbar
2. Reconciliations
You can reconcile the Inventory, Customer and Vendor account balances by comparing the account balance calculated by the sub-ledger transactions with the account balance calculated by the finance ledger transactions. Reconciliation is a recommended practice before period closing to verify the account balance and the transactions in the sub-ledger account.
2.1 Inventory
- Reconcile the inventory account balance for a historical period by using the Historical Inventory Valuation summary report (IN617000).
- Reconcile the inventory account balance for the last activity period by using the Inventory Valuation summary report (IN615500)
- Run either of the two reports above
- Run the Trial Balance Summary report and find the balance of the Inventory account and check if it agrees
- If the balance disagrees, in the Inventory module, you can review the transactions one by one by using the Inventory Transactions by Account form (IN403000). In the Finance module, you can review the transactions
one by one by using the Account Details form (GL404000) for the same period and inventory account, respectively. - If there is an inventory transaction on the Inventory Transactions by Account form (IN403000), which is missing in the GL account on the Account Details form (GL404000),
- Review the inventory transaction and make sure the ledger transaction has been generated for it; the transactions could be not generated if the Update GL box was unticked when the inventory transaction was released.
- Review the Post Transactions form (GL502000) to see if there are any Unposted batches of journal transactions, process the needed transactions to eliminate the discrepancy.
- If there is a ledger transaction on the Account Details form (GL404000), which is missing on the Inventory Transactions by Account form (IN403000), open the batch of journal transactions and find the source document for it. Depending on the reason why the ledger entry has been directly processed to the inventory account without the processing from the Inventory module, you can correct the ledger transaction, or process the missing inventory transaction in the Inventory module and reverse the generated batch to equate the balance of the inventory account in the modules.
- When the Validate Inventory Process is Helpful:
This process can be used to recalculate the inventory account balance for periods. Note that this process doesn't affect the on-hand quantity of items in inventory, because this quantity is updated with every released inventory transaction and tracked separately from the inventory account balance. So, the process that you can run on the Validate Inventory form (IN505000) performs the following operations:
1. Recalculates the available quantity and the subtotals by allocation type that are stored in the database and that you can view on the Inventory Summary form (IN401000). This operation is always performed when you run the process on the form.
2. Clears all transaction history for the inventory account in the Inventory module, which you can view in the Historical Inventory Valuation report (IN617000), rebuilds the history again and recalculates the balance of the inventory account in the module by the released inventory transactions. To perform this operation, you select the Rebuild Item History box on the form and specify the start financial period. The system rebuilds the transaction history for each financial period starting from the specified one up to the last activity period in the module.
2.2 Receivables
To complete the Receivables reconciliation, for each GL account used in Receivables documents, you compare the total balance of open documents with the balance of the GL account according to the transactions posted to the account in Finance. The balances must be equal. Before you reconcile the balances, you will review the unreleased Receivables documents, release the needed ones, and delete or edit the other ones, if there are any, because you are going to close the period. You cannot close the period in Receivables if there are unreleased documents that need to be posted to the period.
To complete the reconciliation, do the following:
- Review the unreleased Receivables documents and release the needed documents, if there are any, as described below:
- On the AR Edit report form (AR611000; Receivables > Reports), specify the from and to period, tick Include Transactions on Hold and click Run Report. For the specified period, the report shows Receivables documents that haven't yet been released—that is, the documents that have the On Hold or Balanced status.
- Release any invoices shown in the report. To release an invoice, open the document on the Invoices and Memos form (AR301000) by clicking the reference number link in the report, clear the Hold box and then click Release on the form toolbar.
- Reconcile the total of open Receivables documents with the balance of the Receivables GL account as follows:
- On the AR Balance by GL Account report form (AR632000; Receivables > Reports), specify the following report parameters and click Run Report:
Report Format:
Open Documents
Financial Period:
(Period being reconciled)
Include Applications
Unticked
For the specified period, the report shows the Finance accounts used in Receivables documents and the list of documents that have been posted to these accounts and are open at the end of the period.
- Obtain the trial balance for the period by using the Trial Balance Summary report (GL632000) located in Finance > Reports.
- Compare the balance of the Accounts Receivable account according to the AR Balance by GL Account report (AR632000) and Trial Balance Summary report (GL632000).
During the reconciliation, you might find a discrepancy between the total balance of open Receivables documents by GL account and the balance of this account according to the trial balance. The discrepancy could be caused by transactions being posted to the GL account directly from the finance module without a document being processed in Receivables. Another possible cause of the discrepancy is the presence of unposted batches generated from Receivables documents. To review the batches that have been released but not yet posted, you can use the Post Transactions form (GL502000; Finance > Processes)
- On the AR Balance by GL Account report form (AR632000; Receivables > Reports), specify the following report parameters and click Run Report:
2.3 Payables
To complete the Payables reconciliation, for each GL account used in Payables documents, you compare the total balance of open documents with the balance of the GL account according to the transactions posted to the account in Finance. The balances must be equal. Before you reconcile the balances, you will review the unreleased Payables documents, release the needed ones, and delete or edit the other ones, if there are any, because you are going to close the period. You cannot close the period in Payables if there are unreleased documents that need to be posted to the period.
To complete the reconciliation, do the following:
- Review the unreleased Payables documents and release the needed documents if there are any, as described below:
- On the AP Edit report form (AP610700; Payables > Reports), specify the from and to period, tick Include Transactions on Hold and click Run Report. For the specified period, the report shows Payables documents that haven't yet been released—that is, the documents that have the On Hold or Balanced status.
- Release any documents shown in the report. To view the bill, click the reference number of the bill in the report. On the Bills And Adjustments form (AP301000) that opens for the bill, clear the Hold box and click Release on the form toolbar.
- Reconcile the total of open Payables documents with the balance of the Payables GL account as follows:
- On the AP Balance by GL Account report form (AP632000; Payables > Reports), specify the following report parameters and click Run Report:
Report Format:
Open Documents
Financial Period
(Period being reconciled)
Include Applications:
Unticked
For the specified period, the report shows the Finance accounts used in Payables documents and the list of documents that have been posted to these accounts and open by the end of the period.
- Obtain the trial balance for the period by using the Trial Balance Summary report (GL632000) located in Finance > Reports.
- Compare the balance of the Accounts Payable account according to the AP Balance by GL Account report (AP632000) and Trial Balance Summary report (GL632000). During the reconciliation, you might find a discrepancy between the total balance of open Payables documents by GL account and the balance of this account according to the trial balance. The discrepancy may be caused by transactions being posted to the GL account directly from the finance module without a document being processed in Payables. Another possible cause of the discrepancy is the presence of unposted batches generated from Payables documents. To review the batches that have been released but not yet posted, you can use the Post Transactions form (GL502000; Finance > Processes)
- On the AP Balance by GL Account report form (AP632000; Payables > Reports), specify the following report parameters and click Run Report:
2.4 Banking
Ensure all banking transactions have been reconciled for the full month using the same Bank Reconciliation process that is part of your day-to-day processes.
3. GST Return
After confirming all transactions have been entered/released and the AR and AP financial periods are closed:
- Prepare Tax Report
- On the Prepare Tax Report form (TX501000; Taxes > Processes) choose the Tax Agency as IRD.
- The tax period will default to the next Open period.
- The Taxable Amounts and Tax Amounts for each % category will be shown on the screen with the Net Tax to pay/refund at the bottom.
- Select ‘Prepare Tax Report’ to be taken to the next screen
- IMPORTANT: Do not select Release Tax Report until step 2 has been completed
- Reconcile Tax Report
There are two reports which can be used to reconcile your GST amounts- Run the Tax Summary Report (TX621000; Taxes > Reports) by selecting the Tax Agency and Tax Period (the period status will be Prepared). The report will show the Taxable and Tax Amounts in report format along with the Net Tax and can be saved or printed
- Run the Tax Details Report (TX620500; Taxes > Reports) by selecting the Tax Agency and Tax Period (the period status will be Prepared). The report displays the individual transactions making up the total amounts.
- Use these reports to ensure all transactions have been included and agree to your GL accounts and financial reports. Investigate/release any missing transactions.
- If you need to add/amend transactions, select Void Report from the Release Tax Report screen and then repeat the steps above to Prepare a new Tax Report.
- Release Tax Report - Do not complete this step until you have reconciled your figures as it cannot be reversed.
- On the Release Tax Report form (TX502000; Taxes > Processes) select the Tax Agency and Tax Period
- Once the Tax Report is released it cannot be voided, reversed, or edited. A revision would need to be created (if your IRD supplier has the Update Closed periods option ticked) and adjustments created. Speak to your consultant if you end up in this situation.
- Select the Release function to close the tax period and optionally generate an AP Bill for the IRD supplier if that option is ticked on the supplier.
- Generate GST Return report
- From the Goods and Services Tax Return (GST101A) form (TX6000 Taxes > Reports) select the Tax Agency and Tax Period and Run report
- The GST form will be displayed and can be Sent or Exported from this screen.
It is important that all transactions are entered, and the tax report is reconciled prior to the Release Tax Report step as this closes the Tax Period (and optionally creates the vendor bill on the IRD Supplier if this option is selected). Because of this, no more transactions are included for the tax period of the Tax Report because the next step is filing the return. Ideally, you would carry out the Release Tax Report step immediately prior to filing the GST return. The Financial periods can remain open if you are willing to accept more invoices for your financial reporting figures but for GST purposes, they move to the next open Tax period and are reported then. This leads to reconciliation differences though so, to keep them reconciled, we would recommend you close the AR and AP financial periods and then Prepare your Tax Report.
The Release Tax Report form does pop open when the Prepare Tax Report is run which does make it easy to click Release before it is ready. Just close this form and go back to it later.
4. Close/Lock Financial Periods
4.1 Closing a Financial Period
Periods can be closed at a sub-ledger level or at the Finance Module level. For example, if you have created all customer invoices and finished the bank reconciliation then you can close the Receivables and Banking modules but then leave the Payables Module open while still processing Vendor Bills. Closing the periods at a Finance Module level closes them for all the sub-ledger modules too.
Once you have posted all the necessary transactions to a financial period and verified the reports, you can close the financial period. Financial periods in MYOB Acumatica have one of four statuses.
- Inactive
- Open
- Closed
- Locked
Each status applies to a range of periods; if a user closes a period, all the periods that precede it are assigned the same Closed status. There may be four period ranges with different statuses: Locked, Closed, Open, and Inactive. The status Locked prevents changes to the data that has been verified and disclosed in reports. A locked period cannot be used by a validation process, for data entry, or for posting in any subledgers. Before closing or locking periods, the system checks for any unposted transactions in these periods.
The following diagram illustrates the states of financial periods and the actions that can be performed on financial periods.
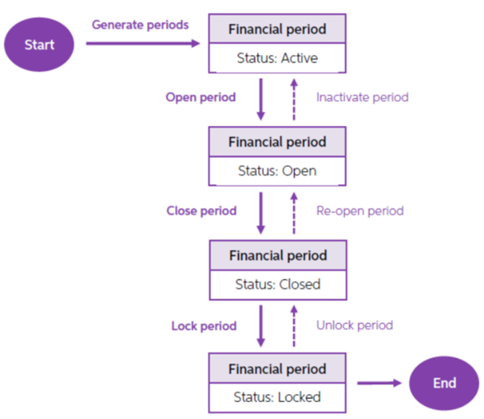
Financial periods can be closed/locked starting from the first period of the first financial year. You can close/lock multiple periods at once (for instance, all periods of a year).
To be able to close a financial period in a sub-ledger module (Inventory, Receivables, Payables, Fixed Assets, Banking), you do the following
- On the Close Financials Periods form (nn509000; Module > Processes), select the current financial period and click Unreleased Documents on the form toolbar.
The Unreleased Documents report shows transactions that have the On Hold or Balanced status in the system and haven’t been processed yet. Review each unprocessed transaction on the report and either release or remove it or change the post period in the transaction so that the report is empty for the periods that you are going to close. You cannot close a financial period in the sub-ledger modules until there are no unprocessed transactions in this period in the module. - Once there are no remaining unprocessed transactions, select the financial period to be closed and select Process from the form toolbar.
To be able to close a financial period in the Finance module, you do the following
- Make sure the previous period is closed in the finance module.
- Make sure you have no batches with statuses On Hold, Balanced or Unposted in the period you are going to close from the Unposted Documents tab. After that, you can close the financial period in the finance module. Once the period is closed in the finance module, the system generates the auto-reversing batches to the next period if Generate Reversing Entries is set to On Period Closing on the General Ledger Preferences form (GL102000).
Complete the following steps: - Go to Manage Financial Periods form (GL503000; Finance > Processes) and select Action Close.
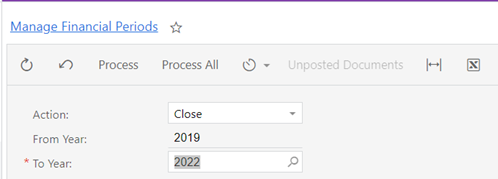
- Select the current year as the To Year, select the period(s) to be closed in the table below then select Process from the form toolbar or alternatively select Process All to close all periods for the year. A popup box will appear advising that the periods will be closed in Accounts Payable, Accounts Receivable, Cash Management, Inventory and General Ledger.
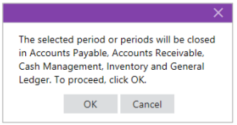
- Click on OK.
- To Lock Periods, perform the same steps but select Action as Lock instead.
With the support for company-specific calendars, users can now activate and deactivate financial periods for posting for a particular company and can close books separately in each company within the tenant.
On the User Roles screen (SM201005), the Financial Supervisor role can safely post to closed periods while all other users cannot work with those periods, i.e. when the Restrict Access to Closed Periods check box is selected on the General Ledger Preferences screen (GL102000). Users assigned to this role can reopen closed periods and unlock locked periods if needed. Care should be taken with posting into closed periods knowing this will affect distributed reports or filed GST returns. Once done, locking a period will prevent further data changes by any user role.
4.2 Closing a Financial Year
To close a financial year in the system, you close the last financial period of the year in the Finance module. Once the year is closed, the system updates the Retained Earnings account with the amount accumulated on the YTD Net Income account. No closing entries are recorded. Regardless of year closing, the system always transfers the balances of the balance sheet accounts to the next period and sets the beginning balances of the income statement accounts and YTD Net Income equal to zero in the first period of each financial year.
The system automatically tracks changes on the YTD Net Income account throughout financial years. Thus, if you later post a transaction that affects the YTD Net Income account in a closed year, the Retained Earnings account will be automatically updated in the financial periods of the next years.
4.3 Generating a New Financial Year
To define and generate financial periods in the system, open the Master Financial Calendar form (GL201000; Finance Profiles) and do the following:
- Set the Financial Year to the current year, click the Generate Calendar button from the toolbar.

- From the pop-up window, specify From Year and To Year as the new year and then click OK to generate the financial periods.

You have defined financial periods for the new year. However, the financial periods are not yet active; in the next step, you activate the needed periods. - In the Finance module, you activate the financial periods that you have generated. Once activated, a financial period can be used in finance and other modules of MYOB Acumatica. Transactions can be entered and posted to only active financial periods. To activate all periods in your new year, do the following:
- On the Master Financial Calendar form (GL201000), select the new Financial Year
- From the Actions button on the toolbar, select Open Periods.

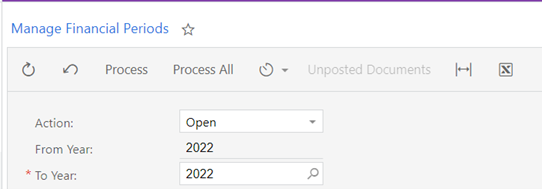
- From the new window, Manage Financial Periods (GL503000; Finance > Processes), select the below –
Action: Open
From Year: your new year
To Year: your new year - Click Process All from the toolbar
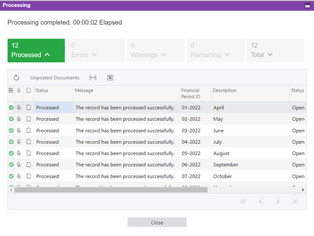
The processing window will display details of the records processed. In case of errors or warning, the details will appear under the processing window.
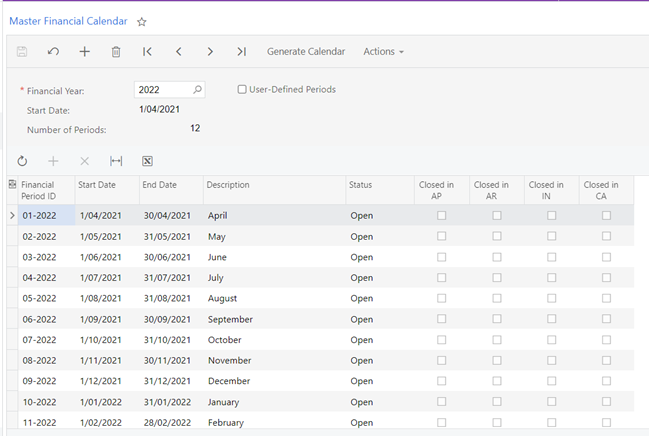
At any time, you can have multiple active periods; activating a period doesn’t require closing a previous one. Now all periods of your new year are active and open, and you can enter and post transactions to any financial period in this year.