.png?width=300&name=mediamodifier_image%20(30).png)
MYOB Acumatica is a powerful system; augmented with many features that can make your business more efficient.
Scheduling and Automation
One of the powerful features of MYOB Acumatica is the ability to schedule processes and have them run at designated times. These schedules can be created in every Module of MYOB Acumatica. Every single process can be either run immediately or scheduled to run later.
For example, in Distribution, it is beneficial to get all the shipments created by night and perhaps print the pick slips in the morning.
How do I create a distribution schedule in MYOB Advanced?
To create schedules for shipments, select Process Orders under the Sales Order module. Select Create Shipment as the Action item and click on the Schedule icon.
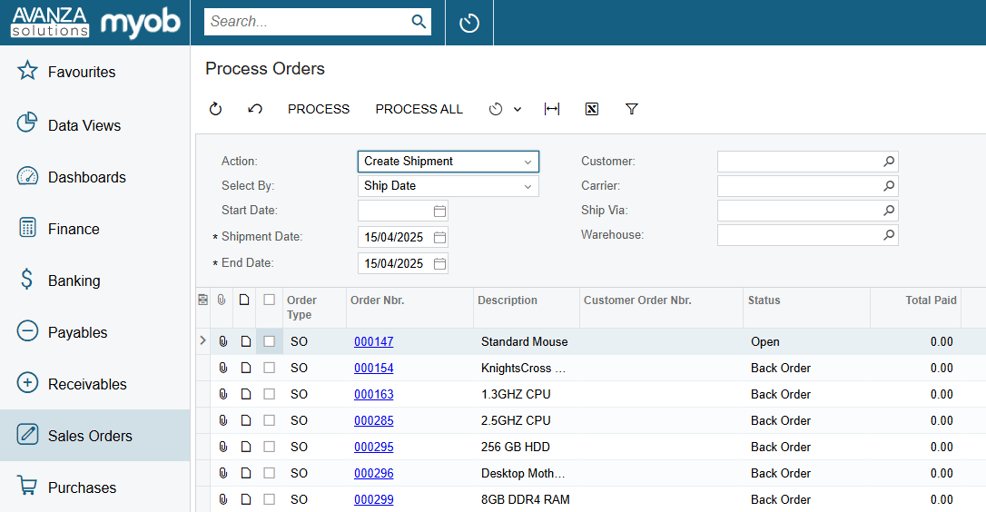
Select Add button to add a schedule.
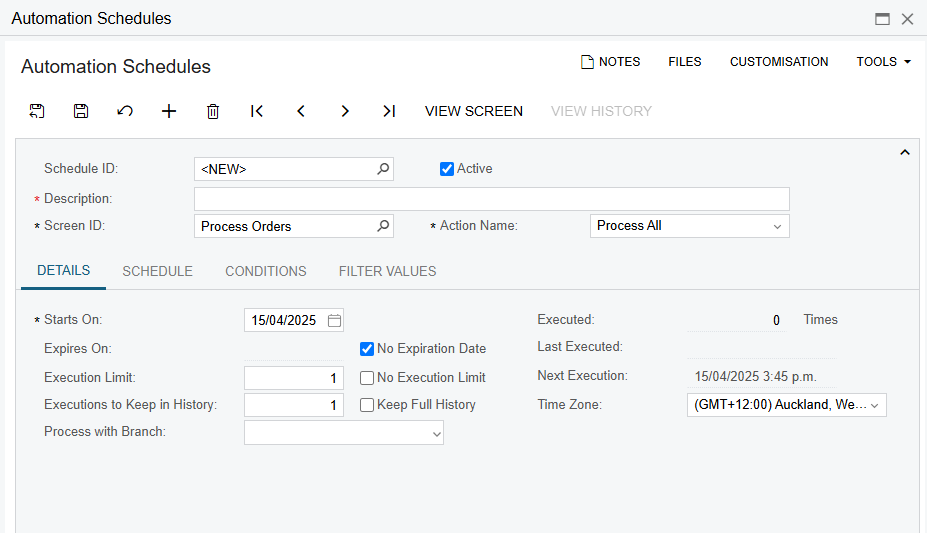
The execution limit field allows you to run these schedules many times. This is most often used in the case of recurring Bills. You can decide how much history you would like to keep and choose a specific Branch to run the schedule if you have multiple companies or branches.

You can specify the Schedule Type, Schedule Details, and Execution time. Although you can select Process All, you can also set conditions on these schedules. These conditions will allow the orders to go through the priority line.
The Filter Values tab allows you to define the required action which is relative to the schedule. In this case, it can show information such as the shipment date.

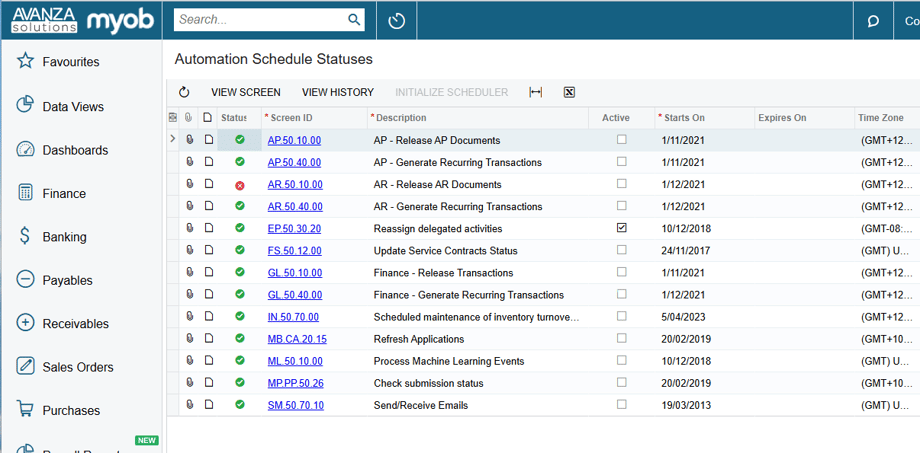
The Automation Schedules Statuses screen lists all the schedules that are currently active.
Side Panels in MYOB Advanced (or how to add side panels in MYOB Acumatica)

Adding a side panel to any Generic Inquiry will display detailed information about each line of the GI in MYOB Acumatica. For instance, in a list of purchase orders, you could show the purchase order details or display the supplier record details on the side while you are on the same screen. This is instead of having to separately go into Vendor’s screen and searching for the supplier id to get the supplier details for that PO. This will save you multiple clicks and avoid you falling into rabbit holes.
As of the 2021.1 release, Side Panel functionality has been extended to include CRM, Primary Lists of Opportunities, Business Accounts, Contacts, and Cases screens. These side panels can be configured to show a wide range of information. Business Account records, Contacts, Opportunities, Sales Order information, Receivable account balance information, or Projects are all examples of what can be displayed for a Side panel on a Business Accounts screen. This information can be displayed as a related screen, a Generic Inquiry, or as a dashboard widget.
Side Panels may be one of the most underused features in MYOB Advanced, yet they represent a significant opportunity to further improve your efficiency.
How do I set up Side Panels in MYOB Acumatica?

On the Navigation tab, click the plus sign under Navigation Targets and select the magnifying glass to get the screen selection list. Select the Purchase Order detail screen Id and assign Side Panel as the Window Mode.
On the Navigation Parameters, set up the Order Type and Order Number field parameters.

To set up the supplier side panel to Purchase Order Generic Inquiry, add the Supplier screen under the Navigation Targets and assign the Side Panel as the Window Mode. Add the navigation parameters for the supplier screen.
In Purchase Order Generic Inquiry, click the left arrow icon to view the side panel. You also switch between the PO details screen and Supplier details screen.

As you go down the list of PO records, the side panel view changes accordingly.


Conditional Formatting for improved visibility
MYOB Acumatica provides the ability to highlight different rows or cells of information within a Generic Inquiry based on their data. This is just like the Conditional Formatting setting in Excel. By highlighting certain data thresholds automatically, you are more aware of the information that matters most. Make reading dashboards and reports simple and easy by customising your GIs with Conditional Formatting.
The core of MYOB Acumatica are these grids that they call ‘Generic Inquiries’ and they are very powerful. But with so much information in the grids, it can be hard to read. Let’s say, for example, you’ve got a column that says, “Margin of Profit.” In the past, your eyes would have to go down the screen and you’d look at all the numbers to find, for example, anything that was less than a 10% gross margin. You would have to look at each line carefully because it could be 11, which looks close to 10. Or you could apply filters, but then you don’t have a complete view of the information as a whole.
MYOB Acumatica has functionality where you can automatically highlight rows or columns of your choice. For example, all of the gross margins that are less than 10% can be in red, results that are 10 to 15% in yellow, and everything that is above 15%, maybe you don’t color at all. Just imagine, now you’re looking at a whole grid of information but you can quickly get a visual picture of what is going on.
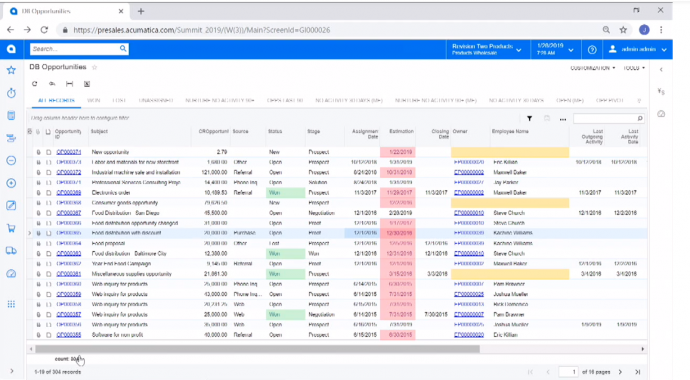
This is a Generic Inquires screen showing all Opportunities. Conditional highlighting has been set up so that all of the opportunities that have a status of “won” show up in green. Opportunities that are unassigned show up in yellow. And opportunities that are overdue show up in red.
Now you don’t need to take that information out into Excel or print a report and highlight with your fancy pens, you can stay on one screen in MYOB Acumatica and see the same information but in a more visually specific way.
It is near-impossible to fully understand the scope of MYOB Acumatica, there are always new or under-used features that you can use to your advantage.